| Smedge has moved on. Now you can get the ease of use of Smedge 2 with the power of Smedge 3 in the new Smedge. Check out the Smedge Downloads page to download the updated Smedge for Windows, Mac, or Linux and get started right away. |
Überware
<info@uberware.net>
©2000-2009 Überware. All rights reserved.
Smedge2
| HOME | PURCHASE | DOWNLOAD | MANUAL | FAQ | ISSUES |
|
NUMBER 37.3 16 September, 2004 |
The Smedge Client
Client Settings
This dialog allows you to configure how Smedge will act as a render client.
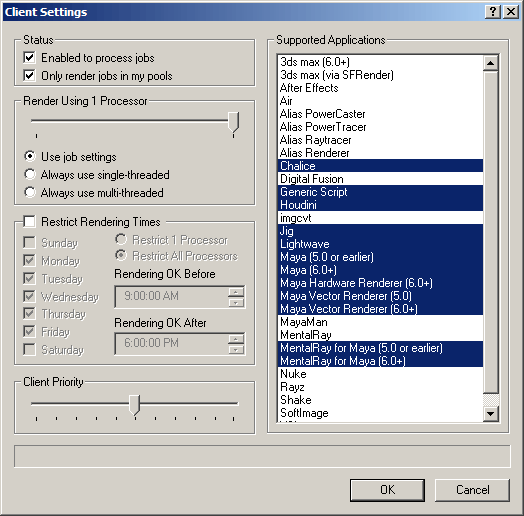
The slider in the top left can limit the number of processors available for Smedge to use on the client. The radio buttons under that slider tell smedge how to use those processors for jobs.
Some renderers cannot be launched multi-threaded and these settings will not apply to those render processes.
- Use Job Settingsmeans to distribute processors according to the settings in the job.
- Always use single-threaded tells Smedge that this client should always launch a single threaded render process, and to launch as many of these processes as necessary to utilize available processors.
- Always use multi-threaded tells Smedge to launch a single render process that uses the available processors.
In the top right is a list of the render types that Smedge currently supports. By selecting items in this list, you tell Smedge which renderers this particular client can support. In the example above, the client supports the Generic Script and Maya renderers only.
Restrict Render Times tells Smedge to not allow this client to preform renders during specific times. You can use the day check boxes to pick the days that are restricted.
- The Rendering OK Before and Rendering OK After controls tell Smedge what times during the restricted days to allow rendering. If a day is not restricted, these times will be ignored and rendering will be allowed.
- The radio buttons tell Smedge how restrictive to be: Restrict 1 Processor will tell Smedge to always make sure at least one processor is unused during the restricted times; Restrict All Processors will tell Smedge to make sure all processors are unused during restricted times.
The check boxes in the Status section are global controls for the render client.
- Enabled to process jobs is a master switch to turn on or off the client. If unchecked, Smedge will not render on this client at any time.
- Only render jobs in my pools tells Smedge if this client is allowed to render "out of pool" jobs: i.e., jobs that are assigned to a pool in which this client is not a member.
The Client Priority is another parameter that Smedge uses to prioritize the distribution of work. Higher priority clients will be assigned work first, assuming all other things are equal, and that more than a single client idle. For the purposes of this sort of prioritization, Smedge uses a granularity of about 1 second. You can use this control to try to make sure that your faster machines will pick up work first if your system is completely idle, or to make sure that you only uses workstations to render if all the render boxes are already in use.
The space at the bottom will display a note that is attached to the client, if there is one.
Smedge Options
This dialog allows you to configure how Smedge will interact with you on the desktop. The default settings are minimally intrusive and work well for render-only clients, such as machines in a render farm. For a workstation, you may want to set things up in your own way.You can configure the options for any client from any other client. You can also configure more than one client at a time. Along the top of each page of the settings dialog box is a drop-down list of all the clients you are currently configuring. By selecting a different client from the list, you can configure the settings for that particular client, without affecting the settings for any other client.
Next to each option is a button with two red triangles on it. Pressing this button will copy the current client's value for the option to every other client you are currently editing. This provides an easy way to change a single setting on a large number of clients without affecting other settings that have already been specifically configured.
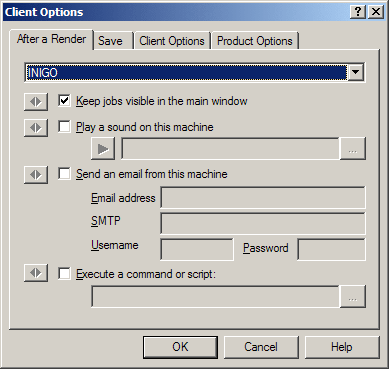
The first page of the options dialog box allows you to configure how this client behaves after a render is finishes successfully.
If you check Keep jobs visible in the main window, jobs will be left in the job list on this client when they finish. Completed jobs appear in a different color, and will not be resubmitted after a recovered crash. All of the job history is also kept, again, on this client only. To get rid of a completed job, select it and use the Delete Job command in the Queue menu.
If you check Play a sound on this machine, the computer will attempt to play a WAV file when jobs successfully complete. You can press the blue Play button to hear a preview of the sound file. If you leave the sound file field blank, Smedge will play a default sound (A gong). You can select any WAV file you want to play. Please note, if you do not have a sound card installed, you will not hear anything.
If you check Send an email from this machine, the computer will try to send the HTML job history file to the specified email address. You must fill in the Email address and SMTP Server fields with your email information. Note that the "From" and "To" fields of the email will both be the email address you supply. Some SMTP servers require authorization to send emails. If you need to provide a username and password, enter them in the fields provided. Note, however, that some SMTP servers do not use this kind of authorization to send emails, in which case you should leave both of the fields blank. Because Smedge is not designed as an email client, it does not support every possible configuration of SMTP server authorization. Please consult with your system administrator if you need to discuss SMTP server setups in your system.
If you check Execute a command or script, the computer will try to execute the command or script file that you put into the text field. You can browse for batch files or scripts.
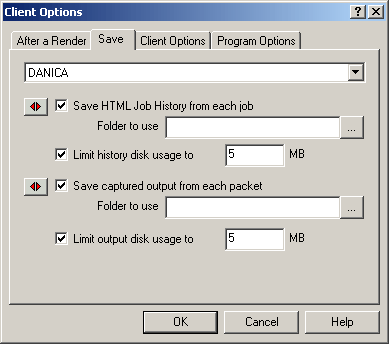
The second page of the options dialog box configures how and where Smedge stores information from the renders.
After each successful render, Smedge can generate an HTML file with the history of the execution of that job. Check the Save HTML Job History from each job check box to enable this behavior. If you have checked this box, you have the option of selecting the folder in which the files will be saved. If you leave the folder blank, Smedge will use its default location: a subdirectory under your TEMP directory called "Smedge." Because these files can fill up your hard disk if you don't delete them, Smedge has the option to limit the total size these files can consume. Every hour, Smedge will clean up files (older files first) to get under the limit you set.
Smedge captures the output from the renderer. To save this output, check the Save captured output from each packet check box. Smedge will dump the entire output to a file. You can configure the folder where Smedge will save these files. If you leave the folder blank, Smedge will use its default location: a subdirectory off your TEMP directory called "Smedge." Inside of this directory, the file will have the scene name, the first frame of the packet, and a ".log" extension. Because these files can fill up your hard disk if you don't delete them, Smedge has an option to limit the size that the folder can consume on your hard drive. Every hour, Smedge will clean up files (older files first) to get under the limit you set.
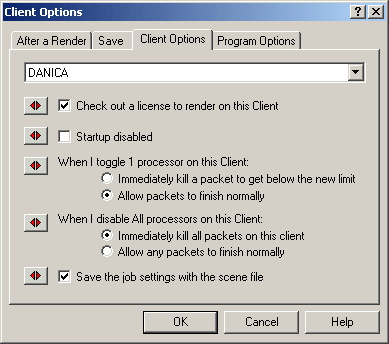
The third page of the option dialog box allows some general configuration options.
Check out a license to render on this Client controls whether this client will request a license from the server to allow it to render. Remember that Smedge does not need to be licensed to control the queue. You only need to check out a license if you want to use this client to render.
Startup disabled tells Smedge to ignore the last saved state for this client and force it to startup disabled.
When you change the number of available processors to Smedge, using either the Disable One or the Disable All controls, your selections on this window control what will happen. For the Disable One command your options are:
For the Disable All command your options are:
- Immediately kill a packet to get below the limit. This tells Smedge to abort enough running packets to get below the new processor limit. If you had two single threaded packets running on the client, Smedge would abort one of them. That packet would then get re-queued. If you had a multi-threaded packet running, Smedge would abort the multi-threaded packet, then start a new packet single threaded.
- Allow the packet to finish normally. This tells Smedge not to mess with any packets, but to use the new processor limit after any running packets finish.
- Immediately kill all packets on this client. This tells Smedge that when you disable this client, you want to immediately stop any work on it. Any packets that are running when you disable the client will be aborted and re-queued.
- Allow any packets to finish normally. This tells Smedge that when you disable this client any work that is currently running on it should be allowed to finish, but no new work will be started.
Save the job settings with the scene file tells Smedge to save a .smr file with all the settings needed to re-submit this job. The file will be saved in the same directory as your scene file and will have the name of your scene file plus the ".smr" file extension. You can later double click this file to re-queue the whole job. You can also use the Load menu option or button to load the .smr file into the Smedge queue.

The last page of the options dialog configures how Smedge operates with the specific products it can use.
The Child Process Priority Class selection allows you to control the priority that Smedge will give to the actual renders it launches. You can select from "Normal," meaning that the processes will have equal priority with other processes on the machine, or "Idle," meaning that the processes will be running at a lower priority than other user processes. If you chose Idle, you may find your machine more responsive even while a render is executing, but the renders will usually take longer to complete.
In the "Renderer Setup" area, you can configure details for each individual product that Smedge can support. First, select the product you wish to configure from the drop-down list (Maya has been selected in the screenshot). You have up to three options you can configure for each product. The Path to Executable has the name and optionally the full path to the executable for the renderer. Note that you generally should not change this unless your product is not in your PATH. Make sure to select the correct EXE file if you do provide a full path, or your jobs will not render.
Please note that the MentalRay for Maya product works slightly differently than all the rest. It uses the path from the normal Maya product to find the actual program file to be executed. In the Path to Executable field for the MentalRay for Maya type, you should put the actual MEL command that starts the render. This should not be a path to an executable, the batch rendering command that comes with the program, or a .MEL script file. If you put anything other than the actual MEL command to start the render, the rendering will fail.For more information, see the MentalRay for Maya section.
In the Path to Environment Script field you can put the full path to a file that Smedge will read for additional environment variables that you may want or need for the renderer to function. Smedge will read this file as a text file, but will not execute it (for example if it is a batch file). Smedge is pretty good at parsing these files, and can even handle expanding environment variables that use other environment variables. However, it is not a perfect system, and if you have complex automated batch systems generating environment variables, they may not work as expected.
For some products, Smedge can extract the filenames generated by the renderer. For these products, Smedge checks that every file that the renderer said it created was actually created and that the files are not empty. If the files do not exist, or are empty, Smedge assumes the renderer failed, and marks the packet to be requeued. There may be times when you want to disable the file check (for example if you have a post-render MEL command that moves the frames around in a Maya scene). You can uncheck the Check frame files upon packet completion box to disable this check.
Check the Launch spawned processes with visible windows button if you want the output from this type of render to always be visible on the screen. When a job of this type starts, Smedge will open an Output Window for the job, and you can monitor the status. The window will automatically cose when the render finishes.
Configuring Smedge across your network
Any of the Client configurations you can do through the Client Settings and Smedge Options dialog boxes, you can change on any client currently connected to your Smedge network. Simply select the client you want to change in the "All Clients" tab of the main window, then choose the Edit Selected Client Settings or Selected Client Smedge Options items from either the Host menu or from the right button context menu.If you have a single client selected and choose Edit Selected Client Settings, Smedge will open the Client Settings dialog box with the current settings from the client that you have selected. When you press OK, Smedge will notify that client of its new settings, and that client will save those settings and update its display if needed. If you have multiple clients slected, Smedge will open the Client Settings dialog with a combined average Client. When you press OK, Smedge will update every client you have selected with the settings you have chosen. Each client will save those settings and update its display if needed.
If you choose Selected Client Smedge Options and you have the local client selected, Smedge opens the Smedge Options dialog box with the current local options. If you have a remote client selected, that client's settings will be displayed, along with the name of the client in the list. If you have multiple clients selected, the dialog box can show you each client's settings, and you can use the buttons with the red arrows to transfer a setting from the current client to all of the other clients you are editing. When you press OK Smedge will notify all the selected clients of the options you have set. Every client will get the settings that exist for that client, and save these options for itself.
Other Smedge configurations
There are other settings you can configure about how Smedge will run on your system. Mostly, these are little things about the how the GUI behaves.Frame Viewer
You can configure which application Smedge uses to view rendered images. Select Select Frame Viewer from the Host menu. Smedge passes the filename to the application in a command line style (e.g., fcheck.exe "filename.iff"). This setting only applies to the current user.Job name prefix
Smedge can automatically append some text to the front of all job names submitted from this machine. You can set this text by selecting Set Job Name Prefix from the Host menu. This setting only applies to the current user.Debug Level
You can adjust the amount of information stored in the debugging log file. This file is useful for when things go wrong. For more information see Debug Level in the Host menu.Job list colors
You can configure the colors used to display the status of Jobs in the list on the main window. Select Colors... from the View menu. This setting only applies to the current user.Window properties
You can adjust several properties about how the Smedge main window behaves. These commands are all in the View menu:
Always On Top Allows you to set the Smedge main window to always stay on top of other windows, even when it is not the active application. Hide on Minimize Allows you to set the Smedge window to disappear from the task bar when you press the minimize button. To restore the window you can either use the System Tray or you can launch another instance of the Smedge.exe program, and your window will be restored. Start Hidden Allows you to set Smedge to always start up hidden. To restore the window you can either use the System Tray or you can launch another instance of the Smedge.exe program, and your window will be restored. Toolbar Toggles visibility of the Toolbar. Status Bar Toggles visibility of the status bar on the main window.